Monitoring the weather conditions in your local area can be an exciting and educational experience. With this Raspberry Pi weather station tutorial, you’ll learn how to create your very own personalized weather monitoring system using affordable, easy-to-find components. By following these simple steps, you’ll be able to track various weather parameters like temperature, humidity, and air pressure right from the comfort of your home.
Step 1: Gather the Necessary Components
To build your Raspberry Pi weather station, you’ll need the following components:
- Raspberry Pi (any model with a 40-pin GPIO header, preferably a Raspberry Pi 3 or 4)
- Micro SD card (at least 8 GB) with Raspbian OS installed
- Power supply for Raspberry Pi
- DHT22/AM2302 temperature and humidity sensor
- BMP280/BME280 pressure sensor
- Breadboard
- Jumper wires (male-to-female and male-to-male)
- Optional: Weatherproof enclosure and outdoor mounting solution
Step 2: Connect the Sensors
First, connect the DHT22 temperature and humidity sensor to the Raspberry Pi:
- Plug the sensor into the breadboard.
- Connect the 3.3V pin on the Raspberry Pi to the VCC (power) pin on the sensor using a male-to-female jumper wire.
- Connect a GPIO pin (e.g., GPIO4) on the Raspberry Pi to the data pin on the sensor using a male-to-female jumper wire.
- Connect a GND (ground) pin on the Raspberry Pi to the GND pin on the sensor using a male-to-female jumper wire.
Next, connect the BMP280/BME280 pressure sensor to the Raspberry Pi:
- Plug the sensor into the breadboard.
- Connect the 3.3V pin on the Raspberry Pi to the VCC (power) pin on the sensor using a male-to-female jumper wire.
- Connect the GND pin on the Raspberry Pi to the GND pin on the sensor using a male-to-female jumper wire.
- Connect the SDA pin on the Raspberry Pi to the SDA pin on the sensor using a male-to-female jumper wire.
- Connect the SCL pin on the Raspberry Pi to the SCL pin on the sensor using a male-to-female jumper wire.
Step 3: Install Required Libraries and Software
Power on your Raspberry Pi and update the software:

sudo apt-get update
sudo apt-get upgrade
Install the required libraries for DHT22 and BMP280/BME280 sensors:

sudo apt-get install build-essential python-dev python-pip
sudo pip install Adafruit_DHT
sudo pip install Adafruit_BMP
Step 4: Create the Weather Station Script
Create a new Python script:

nano weather_station.py
Copy and paste the following code into the script, replacing “GPIO4” with the GPIO pin you connected the DHT22 sensor to:
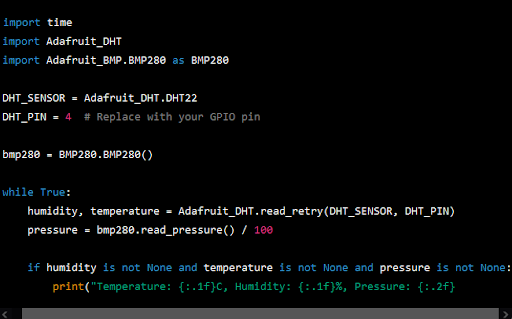
import time
import Adafruit_DHT
import Adafruit_BMP.BMP280 as BMP280
DHT_SENSOR = Adafruit_DHT.DHT22
DHT_PIN = 4 # Replace with your GPIO pin
bmp280 = BMP280.BMP280()
while True:
humidity, temperature = Adafruit_DHT.read_retry(DHT_SENSOR, DHT_PIN)
pressure = bmp280.read_pressure() / 100
if humidity is not None and temperature is not None and pressure is not None:
print(“Temperature: {:.1f}C, Humidity: {:.1f}%, Pressure: {:.2f}